A few weeks ago I stumbled across a video from HAGIWO, a synth-DIYer, who publishs videos about his hobby results on YouTube. And he already got my attention by chosing this video title:
[ $10 ] DIY modular synth TR-808/909 sample play , 4CH wav trigger with seeeduino xiao.
But to build the module yourself you have to visit his website, but it was written in Japanese only. To be honest, as somebody who likes japanese food but never learned to speak/read or write the language, this is kind of hard.
 So I asked HAGIWO (his profile pic to the left), wether he allows me to translate his build tutorial/information and publish his work at my own website (of course by referring to him as the creator and owner of the intellectual property of his code/build) and he granted it.
Disclaimer: Any use of the terms „TR-808“ or „TR-909“ – which are trademarks of ROLAND Corporation – is for educational purposes and/or fair use only and is only used to refer to ROLAND’s globally famous drum machines.
Everything (=pictures & text) below is just courtesy of HAGIWOs work translated into english using DEEPL.com (best translation engine in the world yet):
A memorandum of the modular synthesizer TR-808/909 sample player drum module that I made myself while trying Arduino programming.
Background
This is the 15th piece of programming I’ve started to break out of being a system engineer who can’t write code. Last time I made a kick. The last two times I created hi-hats, and now I have a drum module.
I wanted to create snare and handclap modules to complement the rest.
I considered how to synthesize the tones, but it was difficult, so I decided to use WAV player to achieve this. Sampled sounds from the Roland TR-808 and TR-909, the king of drum machines, were included.

Thoughts on the TR-808/909
To be honest, I’ve never even touched an actual TR-808/909; I’ve only played the SH-32, a Roland desktop synthesizer with built-in drum sounds.
When I was in Japan, I had many opportunities to hear about the development of the TR-808 and 909 at various events (for example, the early 808s were tuned to have a large bass sound, and the prototype used by YMO had a different decay for handclaps than the mass-produced version), and I had a vague admiration for them.
The TR-808 reproduced the drum sound source using analog circuits, and not only did it reproduce the sound, it also had its own charm as an original.
To be honest, I don’t know much about the TR-909. But the sound is easy to use. That’s the extent of my attachment to it.
My favorite songs that use the TR-808 are Mari Iijima’s „Love Sick“ and Yellow Magic Orchestra’s „Music plans“. the combination of the TR-808 and Prophet 5 is great.
Production Specifications
Euro rack standard 3U 6HP size
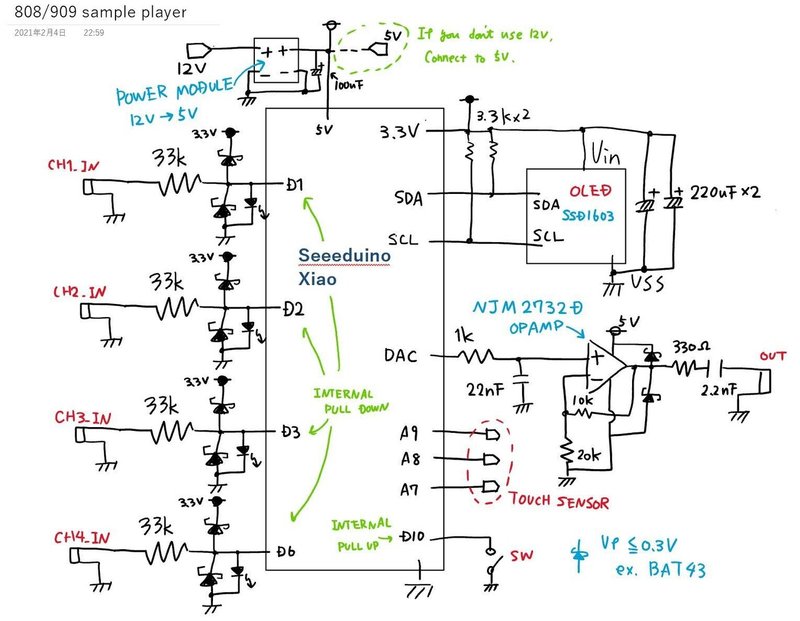
Power supply: 30mA ( at 5V ) / 20mA ( at12V )
Can be operated with 5V single power supply. Or it can be operated by 12V single power supply.
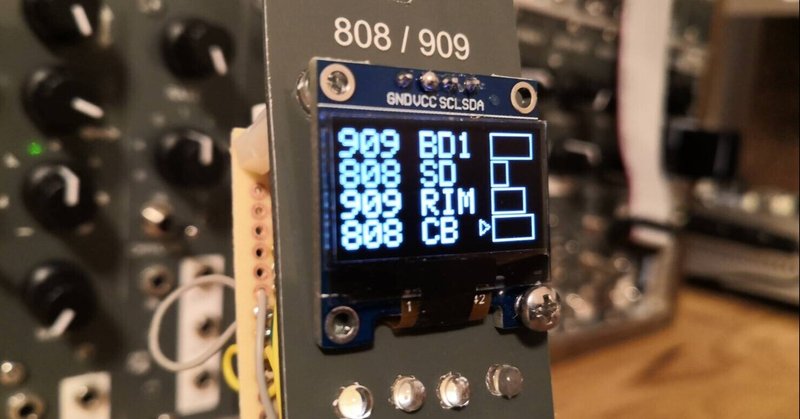
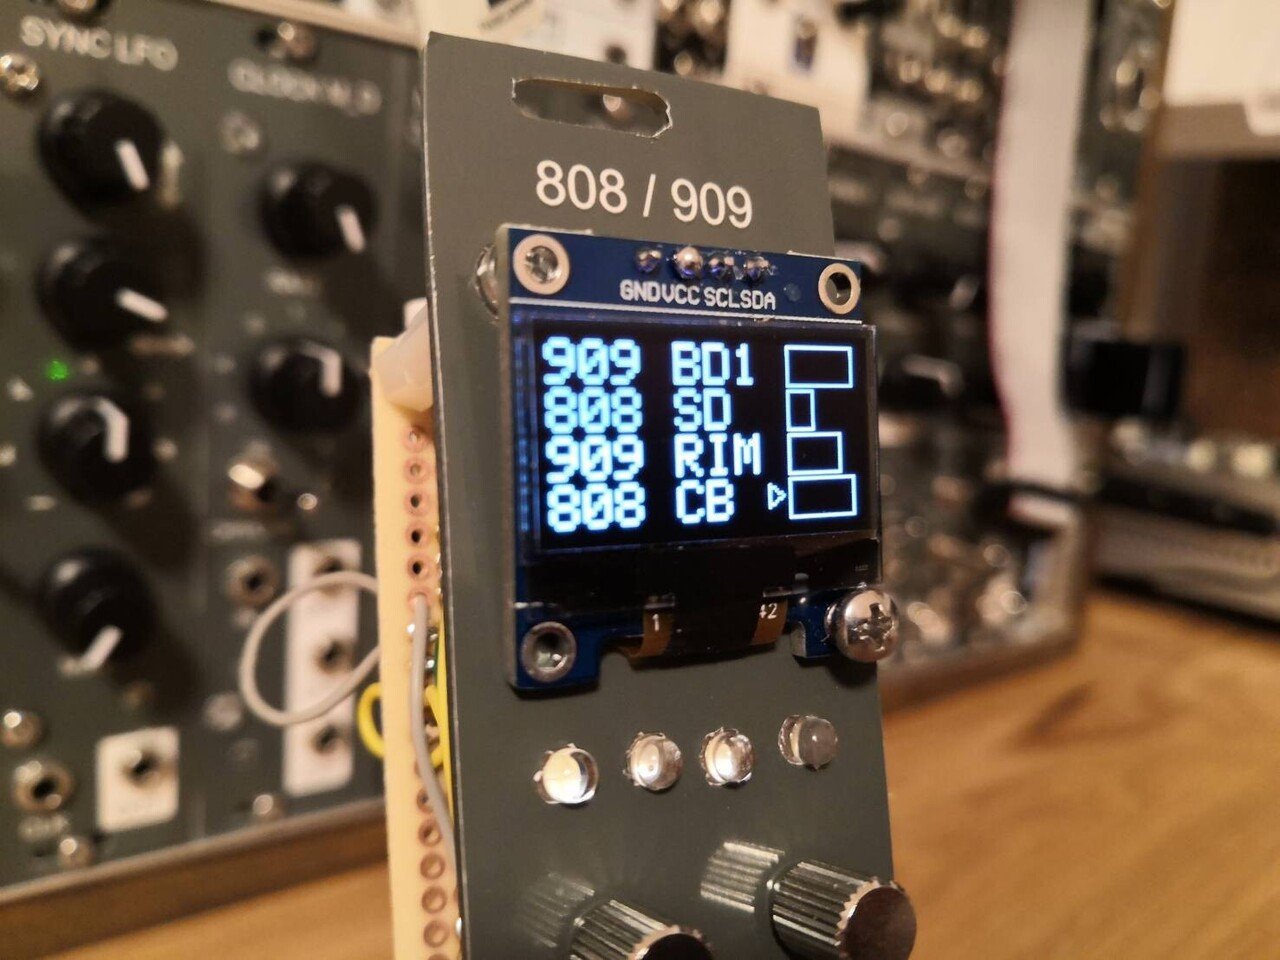
When triggers are received for CH1 to CH4, the drum sample assigned to each CH is played. The sample type is selected from a total of 18 tones, 9 from the TR-808 and 9 from the TR-909.
The drum samples can be output from four sources simultaneously, and the volume can be set for each CH.
The pitch of the samples can be changed. However, the pitch of all 4 channels will be changed at the same time. (It is not possible to set CH1 lower and CH2 higher.
Setting data can be saved. The settings data can be saved, and even if the power is turned off, the saved settings will be read out when the unit is started.
Input/Output
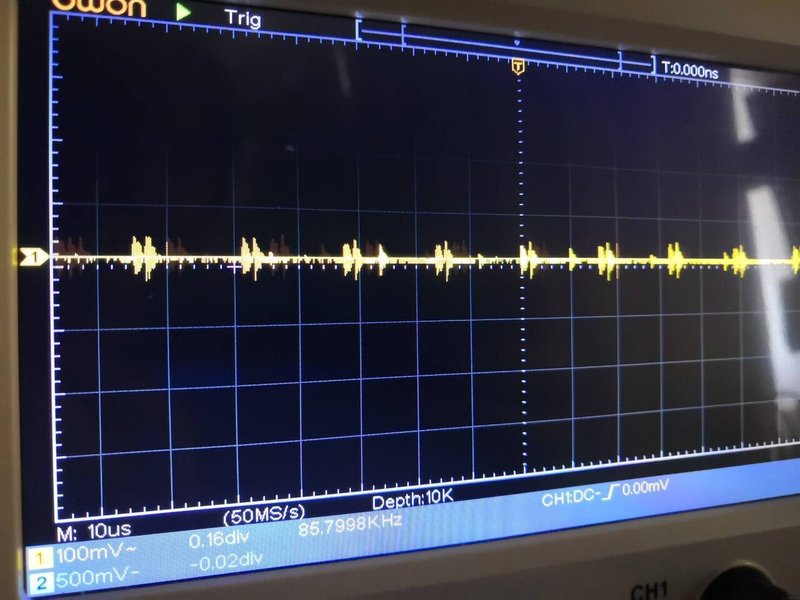
Trigger input: Total of 4 CHs (CH1 to CH4)
4 LEDs light up in conjunction with the input.
Audio output: -2.5 ~ +2.5V, Vp-p 5V. DC coupling.
OLED (Organic Light Emitting Diode) panel: Displays tone, volume, and settings.
Cannot be operated while playing due to microcomputer processing.
Toggle switch: Switches between tone selection and performance.
As mentioned above, due to microcomputer processing, it is not possible to change tones and output audio at the same time, so this switch is used to switch between the two.
Touch sensor: A total of three buttons function as touch sensors.
There are two buttons for left/right selection and one button for switching parameters.
Production cost
Total cost: 1100 yen
Seeeduino xiao 550 yen
OLED 180yen
Op-amp 100yen
Power supply module (12V to 5V) ¥70
Panel 150yen
etc.
Cost reduction by using touch panel for buttons.
Cost reduction of power supply circuit by using inexpensive power supply module made in China.
Almost all parts are procured from Aliexpress.
Programming
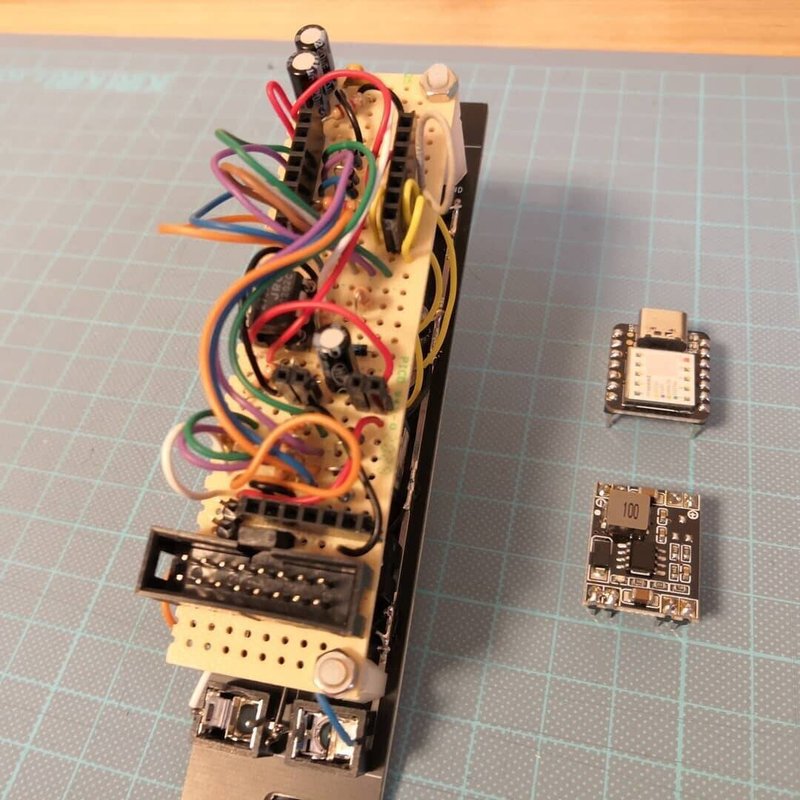
-Seeeduino xiao
Since this project deals with a large amount of audio data, the Arduino nano does not have enough capacity.
Therefore, I used Seeeduino xiao, which can use Arduino IDE and is inexpensive and small.
Seeeduino xiao is easy to use, and anyone who is familiar with Arduino will be able to handle it easily. There may be some incompatible libraries, but since many libraries are available for Seeeduino, we did not have any trouble.
Audio output (built-in DAC)
For audio output, I used Seeeduino xiao’s built-in DAC, which has a resolution of 10 bits, but due to memory limitations, I used 8 bits.
The resolution of the DAC is 10bit, but I used 8bit because of the memory capacity. 8bit 32kHz audio sampling sounds better than 16bit 16kHz.
-Voice memory
There are a total of 18 tones, and each sample is less than 0.3sec to save capacity.
Sampling rate is 8bit 32kHz.
The sampling rate is 8bit 32kHz. 18 samples * 8bit * 32kHz * 0.3 = 172k bytes, which fits into 256k bytes of memory.
See the link below for how to convert wav data to binary.
There are several services that convert mp3 data to binary data, but when I output mp3, a silence of about 0.5sec is inserted at the beginning. (I haven’t checked the reason, but it seems to be due to the data conversion)
So, I chose to rewrite from wav data.
https://stemship.com/arduino-wav2code/
Create a sample of 0.3sec or less in Audacity and output RAW data. After that, you can easily spit out the binary data in Arduino table format using the link below, „PROGMEM Sakuzo-san“.
https://hello-world.blog.ss-blog.jp/2016-10-16
-EEPROM (Flash memory)
It does not have EEPROM, but it can be used like EEPROM by rewriting the Flash memory. If the memory usage is over 90%, the compilation succeeds but the writing fails, so be careful.
See the link below for the library.
http://zattouka.net/GarageHouse/micon/Arduino/XIAO/EEPROM/EEPROM.htm
-Touch sensor
The Seeeduino xiao supports touch sensors, using a library called Adafruit_FreeTouch.h. By tuning the decision threshold and the number of sampling times, it is possible to use touch sensors with high accuracy.
The disadvantage is that it takes time to execute the control, which may affect the audio playback. Therefore, the function of the touch sensor is killed during audio playback.
See below for detailed usage.
-OLED (Organic Light Emitting Diode) panel
The use of OLED is the same as the Arduino nano, and no special care was needed.
Since it takes time to control the OLED display and it affects the audio playback, the OLED display is not switched during audio playback.
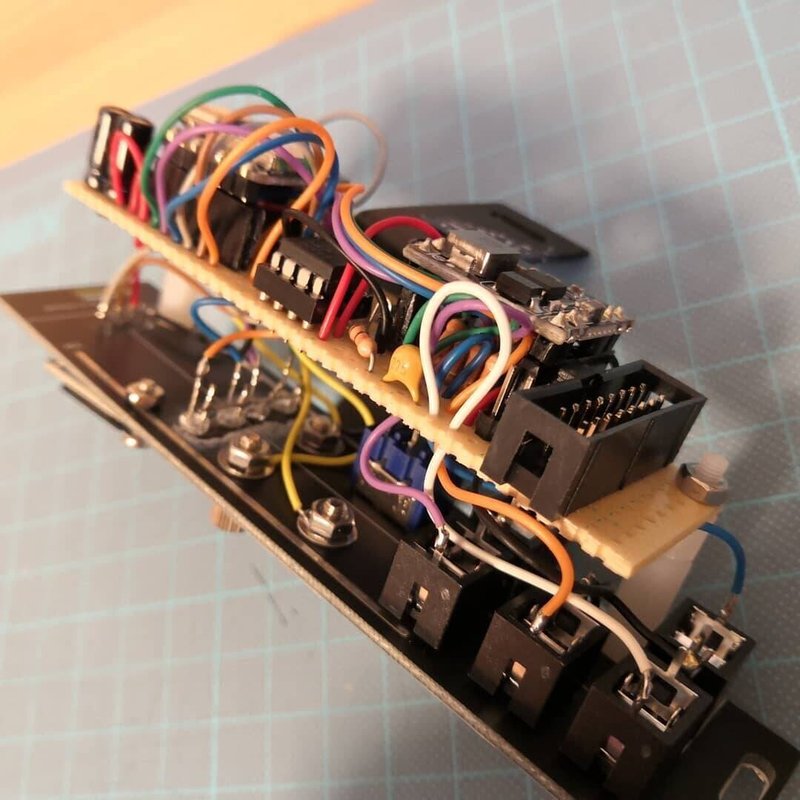
Hardware
-Power supply circuit
The Arduino nano had a built-in 12V to 5V regulator, but the Seeeduino xiao has a built-in 5V to 3.3V regulator, so I needed a way to convert the modular synth power supply from 12V to 5V, since applying 12V would break it.
(This can be solved by connecting to the modular synth’s 5V power supply, but I don’t want to consume 5V, as it is a valuable resource in modular synths. Most power supply modules can handle 1A of 12V, but only about 150mA of 5V.
I used a 12V to 5V DCDC converter that I bought at Aliexpress for 70 yen. 1kHz switching noise is present, but it settled down after I added a 100uF electrolytic capacitor.
-OLED
Annoyingly, it emits a loud noise. There is a large noise on the audio output, which needs to be addressed. The noise source seems to be caused by the charge pump built into the OLED module.
As a countermeasure, two 220uF electrolytic capacitors are inserted between VCC and GND.
In addition, since the larger the display area of the OLED, the larger the noise, we prepared an option to reduce the display area, and prepared a means to reduce the noise instead of sacrificing the appearance of the OLED.
If you can’t take measures with hardware, you can take measures with software and operation. This is what most of the products in the world do.
-Input circuit
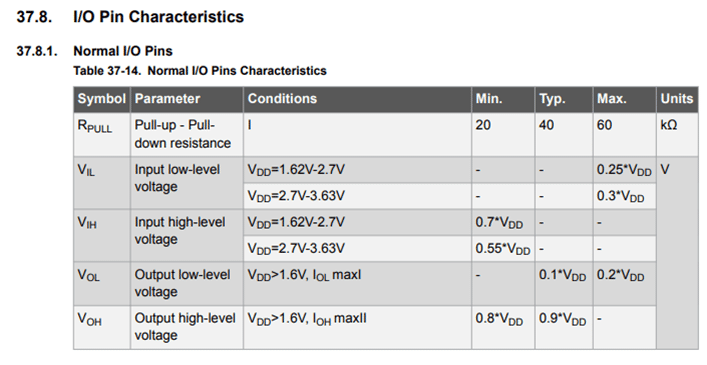
The Seeeduino xiao has the option of a PULLDOWN resistor in the INPUT circuit.
If you use the function pinMode(pin number , INPUT_PULLDOWN), you can use the microcontroller’s internal pull-down resistor.
I checked the datasheet and found that the value of the pull-down resistor is 40kohm, so I used this to reduce the number of external resistors.
-Others
Since the OUTPUT voltage of the DAC is 3.3Vp-p, it is converted to 5Vp-p by a non-inverting amplifier circuit.
The LED in the input circuit is dropped directly to GND, because depending on the forward voltage Vf of the LED, the Seeeduino xiao may not be able to detect the trigger input correctly. In this case, just put a resistor between the LED and the INPUT pin.
Source Code
It’s crude, but I’m releasing it. If there are any bad points, please let me know so I can learn.
The sound data is removed from the source code because it may be related to copyright. Please prepare it by yourself.
You can put the 18 sample data in the following table.
const static byte smpl[18][9900] PROGMEM = {//wav raw data
// sample data , Data deleted due to copyright reasons
};
lude <FlashAsEEPROM.h>//flash memory use as eeprom
#include <Adafruit_FreeTouch.h>//touch sensor

//OLED setting
#include <Adafruit_SSD1306.h>
#include <Adafruit_GFX.h>
#define OLED_ADDRESS 0x3C
#define SCREEN_WIDTH 128
#define SCREEN_HEIGHT 64

#include <Wire.h>//for I2C
#include <avr/pgmspace.h>


// Declaring a display variable
Adafruit_SSD1306 display(SCREEN_WIDTH, SCREEN_HEIGHT, &Wire, -1);
byte mode = 0;//display serect , sample 0-3 and amp 4-7 , pitch 8 , display 9 ,save 10
bool disp_ratch = 0;//1=display change , 0 = no change , for reduce i2c frequency.

bool disp_sw = 1; //1=display update on , 0 = no update for play sound.counter measure of delay by update display and reduce audio noise from display power supply.
bool old_disp_sw = 0;
bool disp_set = 1;//1=font size big but have noise , 0 = font size small due to reduce noise.

//touch
Adafruit_FreeTouch qt_1 = Adafruit_FreeTouch(A7, OVERSAMPLE_32, RESISTOR_0, FREQ_MODE_NONE);
Adafruit_FreeTouch qt_2 = Adafruit_FreeTouch(A8, OVERSAMPLE_32, RESISTOR_0, FREQ_MODE_NONE);
Adafruit_FreeTouch qt_3 = Adafruit_FreeTouch(A9, OVERSAMPLE_32, RESISTOR_0, FREQ_MODE_NONE);
int qt1 = 0;//read touch sensor ,use as select button
int qt2 = 0;//read touch sensor ,use as up button
int qt3 = 0;//read touch sensor ,use as down button
byte qt1_ratch = 0;//0=no signal,1=with signal,2=countermeasure of continuous signal
byte qt2_ratch = 0;
byte qt3_ratch = 0;

//sample setting
int slct_smpl1 = 0;
int slct_smpl2 = 0;
int slct_smpl3 = 0;
int slct_smpl4 = 0;

const static char* smpl_name[] PROGMEM = {//display sample name
 "808 BD ", "808 SD ", "808 TOM", "808 RIM", "808 HC ",  "808 CB ", "808 CH ", "808 OH ", "909 BD1", "909 BD2", "909 SD1", "909 SD2", "909 TOM", "909 RIM", "909 HC1", "909 HC2", "909 CH ", "909 OH "
};

const static byte smpl[18][9900] PROGMEM =  {//wav raw data
 // sample data , Data deleted due to copyright reasons
};

byte pitch = 15;// 31usec = 1sec / 32kHz(sampling rate) ,Adjust by processing delay.

byte ch1_amp = 8;//sample default volume
byte ch2_amp = 8;
byte ch3_amp = 8;
byte ch4_amp = 8;

//ch1 setting
word ch1_i = 0;//Reference binary data of the sample to be played
bool ch1_ratch = 0;//0=no play sample , 1 = play sample
int ch1_sample = 0;//Referenced binary data of the sample to be played
bool ch1_in = 0;//external trig input
bool old_ch1_in = 0;//old external trig input

//ch2 setting
word ch2_i = 0;
bool ch2_ratch = 0;
int ch2_sample = 0;
bool ch2_in = 0;
bool old_ch2_in = 0;

//ch3 setting
word ch3_i = 0;
bool ch3_ratch = 0;
int ch3_sample = 0;
bool ch3_in = 0;
bool old_ch3_in = 0;

//ch4 setting
word ch4_i = 0;
bool ch4_ratch = 0;
int ch4_sample = 0;
bool ch4_in = 0;
bool old_ch4_in = 0;

void setup() {

if(EEPROM.isValid()==1){//already writed eeprom
 slct_smpl1 = EEPROM.read(1);
 slct_smpl2 = EEPROM.read(2);
 slct_smpl3 = EEPROM.read(3);
 slct_smpl4 = EEPROM.read(4);
 ch1_amp = EEPROM.read(5);
 ch2_amp = EEPROM.read(6);
 ch3_amp = EEPROM.read(7);
 ch4_amp = EEPROM.read(8);
 pitch = EEPROM.read(9);
}
else if ( EEPROM.isValid()==0){//no eeprom data , setting any number to eeprom
   slct_smpl1 = 10;
 slct_smpl2 = 5;
 slct_smpl3 = 18;
 slct_smpl4 = 19;
 ch1_amp = 8;
 ch2_amp = 8;
 ch3_amp = 8;
 ch4_amp = 8;
 pitch = 13;
}

 // ディスプレイの初期化
 display.begin(SSD1306_SWITCHCAPVCC, 0x3C);
 display.clearDisplay();  // ディスプレイをクリア
 OLED_display();

 analogWriteResolution(8);
 analogReadResolution(10);
 pinMode(1, INPUT_PULLDOWN);//pull-down resistance typ40kohm
 pinMode(2, INPUT_PULLDOWN);
 pinMode(3, INPUT_PULLDOWN);
 pinMode(6, INPUT_PULLDOWN);
 pinMode(10, INPUT_PULLUP); //for development

 //   Initialize touch sensor
 if (! qt_1.begin())
   Serial.println("Failed to begin qt on pin A7");
 if (! qt_2.begin())
   Serial.println("Failed to begin qt on pin A8");
 if (! qt_3.begin())
   Serial.println("Failed to begin qt on pin A9");
}

void loop() {

 old_disp_sw = disp_sw;
 disp_sw = digitalRead(10);

 if (old_disp_sw == 1 && disp_sw == 0) { //switch on to off , mode 9 setting update
   //    mode = 0;
   OLED_display();
 }

 if (old_disp_sw == 0 && disp_sw == 1) { //switch off to on , mode 9 setting update
   //    mode = 0;
   ch1_ratch = 0;
   ch2_ratch = 0;
   ch3_ratch = 0;
   ch4_ratch = 0;
   OLED_display();
 }

 if (disp_sw == 1 && ch1_ratch == 0 && ch2_ratch == 0 && ch3_ratch == 0 && ch4_ratch == 0 ) {
   //  touch sensor input
   qt1 = qt_1.measure();
   qt2 = qt_2.measure();
   qt3 = qt_3.measure();

   //qtx_ratch == 0 is countermeasure of
   if (qt1 > 930 && qt1_ratch == 0) {
     qt1_ratch = 1;
     disp_ratch = 1;
   }
   if (qt2 > 930 && qt2_ratch == 0) {
     qt2_ratch = 1;
     disp_ratch = 1;
   }
   if (qt3 > 930 && qt3_ratch == 0) {
     qt3_ratch = 1;
     disp_ratch = 1;
   }
   if (qt1 <= 930) {
     qt1_ratch = 0;
   }
   if (qt2 <= 930) {
     qt2_ratch = 0;
   }
   if (qt3 <= 930) {
     qt3_ratch = 0;
   }

   if (qt1_ratch == 1) {
     mode ++;
     qt1_ratch = 2;
     if (mode >= 11) {
       mode = 0;
     }
     else if (mode < 0) {
       mode = 10;
     }
   }

   //select sample
   if (mode == 0) {  //select CH1 sample
     if (qt2_ratch == 1) {
       slct_smpl1 ++;
       qt2_ratch = 2;
       ch1_ratch = 1;//one shot sample play
     }
     else if (qt3_ratch == 1) {
       slct_smpl1 --;
       qt3_ratch = 2;
       ch1_ratch = 1;//one shot sample play
     }
     if (slct_smpl1 >= 18) {
       slct_smpl1 = 0;
     }
     else if (slct_smpl1 < 0) {
       slct_smpl1 = 17;
     }
   }

   else if (mode == 1) {  //select CH2 sample
     if (qt2_ratch == 1) {
       slct_smpl2 ++;
       qt2_ratch = 2;
       ch2_ratch = 1;//one shot sample play
     }
     else if (qt3_ratch == 1) {
       slct_smpl2 --;
       qt3_ratch = 2;
       ch2_ratch = 1;//one shot sample play
     }
     if (slct_smpl2 >= 18) {
       slct_smpl2 = 0;
     }
     else if (slct_smpl2 < 0) {
       slct_smpl2 = 17;
     }
   }

   else if (mode == 2) {  //select CH3 sample
     if (qt2_ratch == 1) {
       slct_smpl3 ++;
       qt2_ratch = 2;
       ch3_ratch = 1;//one shot sample play
     }
     else if (qt3_ratch == 1) {
       slct_smpl3 --;
       qt3_ratch = 2;
       ch3_ratch = 1;//one shot sample play
     }
     if (slct_smpl3 >= 18) {
       slct_smpl3 = 0;
     }
     else if (slct_smpl3 < 0) {
       slct_smpl3 = 17;
     }
   }

   else if (mode == 3) {  //select CH4 sample
     if (qt2_ratch == 1) {
       slct_smpl4 ++;
       qt2_ratch = 2;
       ch4_ratch = 1;//one shot sample play
     }
     else if (qt3_ratch == 1) {
       slct_smpl4 --;
       qt3_ratch = 2;
       ch4_ratch = 1;//one shot sample play
     }
     if (slct_smpl4 >= 18) {
       slct_smpl4 = 0;
     }
     else if (slct_smpl4 < 0) {
       slct_smpl4 = 17;
     }
   }

   //----------------control each ch volume-----------------------
   if (mode == 4) {  //select CH1 sample
     if (qt2_ratch == 1) {
       ch1_amp ++;
       qt2_ratch = 2;
       ch1_ratch = 1;//one shot sample play
     }
     else if (qt3_ratch == 1) {
       ch1_amp --;
       qt3_ratch = 2;
       ch1_ratch = 1;//one shot sample play
     }
     if (ch1_amp >= 10) {
       ch1_amp = 10;
     }
     else if (ch1_amp < 1) {
       ch1_amp = 1;
     }
   }

   else if (mode == 5) {  //change CH2 volume
     if (qt2_ratch == 1) {
       ch2_amp ++;
       qt2_ratch = 2;
       ch2_ratch = 1;//one shot sample play
     }
     else if (qt3_ratch == 1) {
       ch2_amp --;
       qt3_ratch = 2;
       ch2_ratch = 1;//one shot sample play
     }
     if (ch2_amp >= 10) {
       ch2_amp = 10;
     }
     else if (ch2_amp < 1) {
       ch2_amp = 1;
     }
   }

   else if (mode == 6) {  //change CH3 volume
     if (qt2_ratch == 1) {
       ch3_amp ++;
       qt2_ratch = 2;
       ch3_ratch = 1;//one shot sample play
     }
     else if (qt3_ratch == 1) {
       ch3_amp --;
       qt3_ratch = 2;
       ch3_ratch = 1;//one shot sample play
     }
     if (ch3_amp >= 10) {
       ch3_amp = 10;
     }
     else if (ch3_amp < 1) {
       ch1_amp = 1;
     }
   }

   else if (mode == 7) {  //change CH4 volume
     if (qt2_ratch == 1) {
       ch4_amp ++;
       qt2_ratch = 2;
       ch4_ratch = 1;//one shot sample play
     }
     else if (qt3_ratch == 1) {
       ch4_amp --;
       qt3_ratch = 2;
       ch4_ratch = 1;//one shot sample play
     }
     if (ch4_amp >= 10) {
       ch4_amp = 10;
     }
     else if (ch4_amp < 1) {
       ch4_amp = 1;
     }
   }

   //----------------pitch control and display andSAVE-----------------------
   else if (mode == 8) {  //pitch control
     if (qt2_ratch == 1) {
       pitch ++;
       qt2_ratch = 2;
       ch1_ratch = 1;//one shot sample play
     }
     else if (qt3_ratch == 1) {
       pitch --;
       qt3_ratch = 2;
       ch1_ratch = 1;//one shot sample play
     }
     if (pitch >= 52) {
       pitch = 52;
     }
     else if (pitch < 5) {
       pitch = 5;
     }
   }

   else if (mode == 9) {  //save
     if (qt2_ratch == 1) {
       qt2_ratch = 2;
       disp_set = 1;
     }
     else if (qt3_ratch == 1) {
       qt3_ratch = 2;
       disp_set = 0;
     }
   }

   else if (mode == 10) {  //save
     if (qt2_ratch == 1) {
       qt2_ratch = 2;
       save();
     }
     else if (qt3_ratch == 1) {
       qt3_ratch = 2;
       save();
     }
   }

   if (  disp_ratch == 1) {
     OLED_display();
     disp_ratch = 0;
     delay(100);//countermeasure of touch sensor continuous input
   }
   if (ch1_ratch == 1 || ch2_ratch == 1 || ch3_ratch == 1 || ch4_ratch == 1 ) {
     soundout();
   }
 }


 else if (disp_sw == 0) {
   //----------------signal input--------------------------
   old_ch1_in = ch1_in;
   old_ch2_in = ch2_in;
   old_ch3_in = ch3_in;
   old_ch4_in = ch4_in;

   ch1_in = digitalRead(1);
   ch2_in = digitalRead(2);
   ch3_in = digitalRead(3);
   ch4_in = digitalRead(6);
   soundout();
 }

 else {
   soundout();
 }
}

void soundout() {

 if (ch1_i > 9500) {
   ch1_i = 0;
   ch1_ratch = 0;
   ch1_sample = 127;
 }

 if (ch2_i > 9500) {
   ch2_i = 0;
   ch2_ratch = 0;
   ch2_sample = 127;
 }

 if (ch3_i > 9500) {
   ch3_i = 0;
   ch3_ratch = 0;
   ch3_sample = 127;
 }

 if (ch4_i > 9500) {
   ch4_i = 0;
   ch4_ratch = 0;
   ch4_sample = 127;
 }


 if (old_ch1_in == 0 && ch1_in == 1) {
   ch1_ratch = 1;
   ch1_i = 0;
 }
 if (old_ch2_in == 0 && ch2
ハギヲさん、どうもありがとうございました。
5 Antworten auf „HAGIWO presents: $10 DIY modular synth TR-808/909 sample play“
Hi there! I know this is kind of off-topic but I had to
ask. Does operating a well-established website like yours take a massive amount work?
I’m completely new to running a blog but I do write in my journal on a
daily basis. I’d like to start a blog so I will be able to share my experience and thoughts
online. Please let me know if you have any kind of recommendations or tips for new
aspiring bloggers. Thankyou!
I wrote you an email!
Best regards,
Michael
„well established“ honors this site way too much I think… well, it takes a few hours to configure a blank wordpress website but if it is done, it takes only the time you need to write a blog post or to create an article. If you get a lot of comments you have to manage’em too (publish / mark as spam and so on). Another way to start a blog/website would be to use a 1 click-website builder (e.g. wix.com) or use WordPress.com to just start without the hazzle of configuring your site from scratch. I host this site at 1blu.de and there you can deploy a wordpress instance nearly in notime with just 5 clicks or so.
Hey there and thanks a lot for your work!
I believe the code is truncated in the first line „include-> lude“
Also i cannot seem to run it because of a „OLED_display was not declared in this scope“, any clue how to fix that? thanks a million!
I will try to contact Hagiwo and to find out, how fix that! Best regards, Michael
P.S.:
I fixed the wrong code section thanx to your error report. Thank you!